You will need:
- Java Development Kit (JDK)
- Android Software Develpmet Kit (Android SDK)
- Eclipse (IDE)
- Android Development Tools (ADT) plugin for Eclipse
- Connect Eclipse with the Android SDK
1. JDK
Get the latest JDK and start the jdk-7-windows-i586.exe.
Afterwards set the JAVA_HOME environment variable. The path should look like:
c:\Program Files\Java\jdk1.7.0\.
2. Android SDK
Get the latest Android SDK. Use the installer or the binary. However the SDK will endup in a folder on your computer that has no reference to the OS or what so ever. This means, you can place it where ever you want and move it later without losing dependencies you don't know of.
I recommend to put it into a folder like:
c:\Programming\android-sdk.
If you put into the c:\Program Files\... be aware that you have to start the installer with admin rights.
Leave out the version number for the folder name. The SDK can update itself and the folder wouldn’t reflect its truth content.
Start the 'SDK Manager.exe' to open the Manager. If you are in the folder 'Program Files', start it by right click and choose 'As Admin'. It will automatically popup a dialog and ask you to choose from the available SDKs to download. Select all and hit download.
The folder is initially around 60 Mb in size. The downloading takes about 1 hour and will fill you folder up to 1.2 Gb.
3. Eclipse (IDE)
Get the latest Eclipse. I take the package ‘Eclipse for RCP and RAP Developers’. The file you will get is a zip like eclipse-rcp-indigo-win32.zip. Unpack it where ever you want. It has no installer and you can start it right away.
At the first start the IDE asks you to specify the location of your workbench. I put it always inside the eclipse folder and use a relative path.

The benefits are to avoid using the workspace with different IDE versions and I can move the whole project whereever I want in one peace.
4. ADT
Is a Eclipse plugin and can get obtained in the official Eclipse manner.
Select the Help -> Install new Software...
Click ‘Add...’
Name: ADT Plugin
Location: https: https://dl-ssl.google.com/android/eclipse/
Select all available plugins.

Install it and restart the IDE and you should see the following new icon in your coolbar.

5. Connect Eclipse with the Android SDK
Select Window -> Preferences
Click the new Node 'Android'
At the right side you have to specify the path to the Android SDK you have installed in step 2.
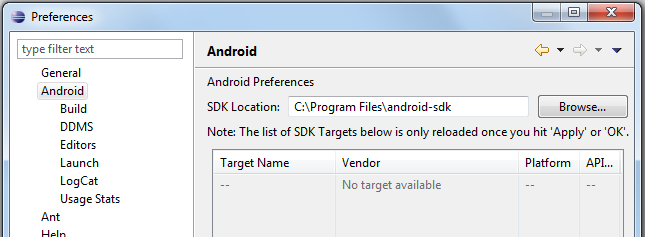
You should get an error that the 'SDK Platform Tools component is mising' but this is normal, you have to download it first.

Click the new Button in the coolbar. This will open the 'Android SDK and AVD Manager'.
No comments:
Post a Comment