Friday, September 30, 2011

Quick SQL Reference

I know SQL very well, the idea of the basic operations and how I can combine them to achive on a higher level nearly everyting I need. But I have a bad memory about the exact syntax. Allways asking me how do I have to write the UPDATE statement?
This Post is a quick lookup of the SQL-Syntax.


key example
CREATE TABLE CREATE TABLE table_name ('column1' NVARCHAR(32),

'column2' NUMBER, ... )

DROP TABLE DROP TABLE table_name
TRUNCATE TABLE TRUNCATE TABLE table_name
INSERT INTO INSERT INTO table_name(column1, column2, ...)

VALUES(value1, value2, ...)
WHERE ...

UPDATE UPDATE table_name
SET column1=value1
WHERE
...

DELETE FROM DELETE FROM table_name
WHERE ...


Data Types
Oracle
MySQL

Editors
Eclipse Data Tools Platform (DTP)
Eclipse SQL Explorer

How To Change @Author In Eclipse Templates

I have the problem of working with one project on multiple computers with different system user names.
This ends up in inconsisten javadoc comments where the tag @author get mixed up with all the system user names.

There are two solutions.


1. Change the system user name localy for the virtual machine Eclipse is running on.
This is the quick and dirty method, but it works globally.

Open your eclipse.ini file and add the following line after -vmargs:

-Duser.name = your name

The dirty part is that it overrides the user.name property which is used by some plugins that need to know the system user name you logged into the underlying OS. This could break them.


2. Change the templates in Eclipse
This hardcodes your user name into all the templates you want to change your name. But the templates are ex-, and importable. Define it once use it everywhere.
I know 2 templates with @author so far.

2.1 New Type Comment Template
Window -> Preferences -> Java -> Code Style -> Code Templates -> Comments -> Types
Press 'Edit...'
Change  @author ${user}  to  @author your name
If the Dialog is closed you can check the check box 'automatically add comments for new methods and types'.

Here you have the option to configure project specific templates. There is a link in the upper right corner 'Configure Project Specific Settings'.

2.2 @author Template
Window -> Preferences -> Java -> Editor -> Templates
Select in the list the template with the name '@author' .
Press 'Edit...'
Change  @author ${user}  to  @author your name

Tuesday, September 27, 2011

JFace: A Viewer For Composites

JFace comes along with these nice Viewers. They build up the next layer ontop of the standard widgets. You are setting you business objects into a Viewer and it knows from its Label- and ContentProvider how to handle them.

A Table got its TableViewer a Tree its TreeViewer, ...
Wouldn't it bee nice to have such a Viewer for Composites?
You stuff you business object into it like a Person object and it knows how to display it. The next time you stuff a Project object into it and you see an UI representation of it.

If you like the idea, have a look at my classes and read further.
Viewer:                CompositeViewer
ContentProvider:  ICompositeProvider
LabelProvider:     Your Composites that draws the UI for the business object.
                            They have to implement the interface IInput or extends the
                            class CompositeInput.


How to use the CompositeViewer:

Instantiate it and give it a size, because it is empty.
 compViewer = new CompositeViewer(parent, SWT.BORDER);  
 compViewer.setCompositeProvider(new CompositeProviderPersonProject());  
 compViewer.setLayoutData(createGridDataForInputFields(200, 200));  

The ICompositeContentProvider implementation looks like this.
 public class CompositeProviderPersonProject implements ICompositeProvider {  
      @Override  
      public Class<?> getCompositeClass(Object o) {  
           if(o.getClass() == Person.class) {  
                return CompositePerson.class;  
           }  
           if(o.getClass() == Project.class) {  
                return CompositeProject.class;  
           }  
           return null;  
      }  
 }  

If you place a Person object.
 compViewer.setInput(new Person("strange", "optics", 35, 'M'));  


If you place a Project object.
 compViewer.setInput(new Project("Strangewt", "More programming convinience!"));  

Monday, September 26, 2011

SWT: More Convenience Please

Are you bored like me writing tons of code for simple formular oriented UI's?
SWT forces us to write more lines of code and specify more parameters than necessary.
Here is one simple example:

 Label label = new Label(parent, SWT.NONE);  
 label.setText("labelname");  

First questions that come up are:

  • Why do I have to specify allways the style parameter when it is in 99.9% of all cases SWT.NONE.
  • Why do I have to create a reference 'label' and set the text of the Label in a second line and not in the constructor.

The guys from SWT missed out the chance to make there classes convenient with one or two more constructors for every widget. Next code snippet shows the minimum constructor for the Label class.

 new Label(parent, "labelname");  

So we have to do something. A convenient method is the answer. Look how efficient the code is. We save more than half of the key strokes.
The idea is actually using the factory method pattern from the Gof (Gang of Four) in a not so narrow sense.

 createLabel(parent, "labelname");  


Here a more complex example. This is a typical task for the UI. A label and text field, multiline textfield where the label is on top of its column and another multiline textfield with two labels. First could be the name an the second an explanation.


The usual code:
 Group group0 = new Group(parent, SWT.NONE);  
 group0.setText("group0");  
 group0.setLayout( new GridLayout(2, false));  
 group0.setLayoutData(new GridData(SWT.FILL, SWT.CENTER, true, false));
  
 Label label0 = new Label(group0, SWT.NONE);  
 label0.setText("label0");  
 Text text0 = new Text(group0, SWT.BORDER);  
 text0.setLayoutData(new GridData(SWT.FILL, SWT.CENTER, true, false));
  
 Label label1 = new Label(group0, SWT.NONE);  
 label1.setText("label1");  
 label1.setLayoutData(new GridData(SWT.LEFT, SWT.TOP, false, false));  
 Text text1 = new Text(group0, SWT.V_SCROLL | SWT.MULTI | SWT.WRAP | SWT.BORDER);  
 GridData gd1 = new GridData(SWT.FILL, SWT.CENTER, true, false);  
 gd1.heightHint = 50;  
 text1.setLayoutData(gd1);
  
 Label label2 = new Label(group0, SWT.NONE);  
 label2.setText("label2");  
 label2.setLayoutData(new GridData(SWT.LEFT, SWT.TOP, false, false));  
 Text text2 = new Text(group0, SWT.V_SCROLL | SWT.MULTI | SWT.WRAP | SWT.BORDER);  
 GridData gd2 = new GridData(SWT.FILL, SWT.CENTER, true, false);  
 gd2.heightHint = 50;  
 gd2.verticalSpan = 2;  
 text2.setLayoutData(gd2);  
 Label label3 = new Label(group0, SWT.NONE);  
 label3.setText("label3");  
 label3.setLayoutData(new GridData(SWT.LEFT, SWT.TOP, false, false));  

The convenient code:
 Group group1 = createGroup(parent, "group1", 2);
  
 createLabel(group1, "label0");  
 createText(group1);  
 
 createLabelTop(group1, "label1");  
 createTextField(group1, 0, 50);  
 
 createLabelTop(group1, "label2");  
 createTextField(group1, 0, 50, 1, 2);  
 createLabelTop(group1, "label3");  


For this purpose I created CompositeBase and GroupBase classes to extend from. If you just want to have the create methods use the WidgetHelper.
The WidgetHelper implements everything as static methods. With a static import for this class, you don't have to prefix every method with the class name.

 import static org.strangewt.widgets.WidgetHelper.*;  

But be aware, Eclipse breaks down a static import when using 'organise imports' Ctrl + Shift + O.
To fix this problem read this.

Friday, September 23, 2011

Eclipse RCP: All My Registries

Using SWT you have to care about your operating system resources such as fonts, colors and images.
Fortunately JFace provides you with a set of registries, for every resource one FontRegistry, ColorRegistry and ImageRegistry. The resources are created lazily when they get accessed and are disposed automatically when the display is disposed.
There are global registries but to avoid conflicting keys you should use private instances.

Here one Example of the usage of an ImageRegistry:
 ImageRegistry imgReg = new ImageRegistry();  
 imgReg.put("avatar", ImageDescriptor.createFromURL(  
    FileLocator.find(bundle, new Path("icons/avatar.jpg"), null)));  
 Image avatar = imgReg.get("avatar");  

You have to instantiate the registry locally, if you want to use it somewhere else you have to make a singleton for it.
The metod put(String key, ImageDescriptor descriptor) takes an ImageDescriptor as an argument, but your image files are normally located in your plugin. You have to get the bundle for the location.
Lot of stuff for just a picture.

Wouldn't it be more easy to have just one singleton for all the registries with lots of convenient methods that take care of alle the specialities like the location of your files?

Have a look at my Registries class:
 package org.strangewt.jface.resource;
/**  
  * Manages all Registries from JFace. <br>  
  * - ColorRegistry <br>  
  * - FontRegistry <br>  
  * - ImageRegistry <br>  
  * First use must be after the <code>Display</code> has been created, this can  
  * be usually done in the method <code>IApplication.start()</code> of the  
  * RCP-Bundles. Afterwards you can set up all your colors, fonts and images by  
  * passing over a derived Object from the <code>IRegistriesConfiguration</code>  
  * interface.  
  */  
 public class Registries {  
      protected static ColorRegistry colorReg;  
      protected static FontRegistry fontReg;  
      protected static ImageRegistry imgReg;  
      private static Bundle bundle;  
      private static Registries instance;  
      private Registries() {  
           colorReg = new ColorRegistry();  
           fontReg = new FontRegistry();  
           imgReg = new ImageRegistry();  
      }  
      /**  
       * Is used to determine the root folder of the application. Get the bundle  
       * from <code>Activator.getDefault().getBundle()</code>  
       */  
      public static Registries getInstance(Bundle bundle) {  
           Registries.bundle = bundle;  
           return getInstance();  
      }  
      public static Registries getInstance() {  
           if (instance == null) {  
                instance = new Registries();  
           }  
           return instance;  
      }  
      public Registries init(IRegistriesConfiguration configurator) {  
           configurator.configure(this);  
           return this;  
      }  
      /**  
       * @param path  
       *      for example icons/background.jpg  
       */  
      public void putImage(String key, String path) {  
           imgReg.put(key, ImageDescriptor.createFromURL(FileLocator.find(bundle,  
                     new Path(path), null)));  
      }  
      public void putImage(String key, Image image) {  
           imgReg.put(key, image);  
      }  
      public Image getImage(String key) {  
           return imgReg.get(key);  
      }  
      public ImageDescriptor getImageDescriptor(String key) {  
           return imgReg.getDescriptor(key);  
      }  
      public void putColor(String symbolicName, int red, int green, int blue) {
           colorReg.put(symbolicName, new RGB(red, green, blue));
      }
      public void putColor(String symbolicName, RGB colorData) {  
           colorReg.put(symbolicName, colorData);  
      }  
      /**  
       * @param hexColorStr  
       *      "00FF00"  
       */  
      public void putColor(String symbolicName, String hexColorStr) {  
           Integer colorValue = Integer.parseInt(hexColorStr, 16);  
           int red = (colorValue & 0xFF0000) >> 16;  
           int green = (colorValue & 0x00FF00) >> 8;  
           int blue = (colorValue & 0x0000FF);  
           putColor(symbolicName, new RGB(red, green, blue));  
      }  
      public Color getColor(String key) {  
           return colorReg.get(key);  
      }  
      /**  
       * Looks up the registry if there is a color for the key. If not, a new  
       * color is instanciated from the hex-representation.  
       */  
      public Color getColor(String key, String hexColorStr) {  
           Color color = colorReg.get(key);  
           if (color == null) {  
                putColor(key, hexColorStr);  
                color = colorReg.get(key);  
           }  
           return color;  
      }  
      public String getColorAsHex(String key) {  
           String hexColorStr = null;  
           Color color = getColor(key);  
           if (color != null) {  
                hexColorStr = toHex(color.getRGB());  
           }  
           return hexColorStr;  
      }  
      /**  
       * Converts the color of an <code>RGB</code> object into his hex values. <br>  
       * RGB(0,255,0) -> "00FF00"  
       */  
      public String toHex(RGB rgb) {  
           String hexColorStr = Integer.toHexString((rgb.red << 16)  
                     + (rgb.green << 8) + rgb.blue);  
           if (hexColorStr.length() == 4) {  
                hexColorStr = "00" + hexColorStr;  
           } else if (hexColorStr.length() == 2) {  
                hexColorStr = "0000" + hexColorStr;  
           }  
           return hexColorStr;  
      }  
      public void putFont(String symbolicName, FontData fontData) {
           fontReg.put(symbolicName, new FontData[] {fontData});
      }
      public void putFont(String symbolicName, FontData fontData[]) {  
           fontReg.put(symbolicName, fontData);  
      }  
      public Font getFont(String key) {  
           return fontReg.get(key);  
      }  
 }  

The configuration interface:
 package org.strangewt.jface.resource;  
 public interface IRegistriesConfiguration {  
      /**  
       * Gets passed over to the <code>Registries</code> where it is used to  
       * configure it self. Typical content: <br>  
       * mr.putColor("active element", new RGB(0, 255, 0)); <br>  
       * mr.putImage("dialog.header", "icons/background.jpg"); <br>  
       * mr.putFont("view.headline", new FontData[] { new FontData("Tahoma", 10,  
       * SWT.BOLD) });  
       */  
      public void configure(Registries registries);  
 }  

To use it, you have to derive the interface and define your resources. Look how easy it is to put an image into the registry.
 public class DemoRegistriesConfiguration implements IRegistriesConfiguration {  
      @Override  
      public void configure(Registries r) {  
           r.putColor("red", 255, 0, 0);  
           r.putImage("avatar", "/icons/avatar_strangeoptics.jpg");  
           r.putFont("courier_bold", new FontData("Courier",10,SWT.BOLD));  
      }  
 }  

Then you have to instantiat the Registries class. Best location in the Aplication.start() method right after the Display is created.

Display display = PlatformUI.createDisplay();  
Registries.getInstance(Activator.getDefault().getBundle()).init(
new DemoRegistriesConfiguration());  

Now you can use the image everywhere in your code.

 Registries.getInstance().getImage("avatar")  

The source code is available in my svn repository at google code.

Wednesday, September 21, 2011

How To Make An In-Page-Link

Linking from one web page to another is the fabric the web is made of. But sometimes this is to coars. Sometimes your informations are on just one page but heavily interrelated.
Thinking of a table of contents for a closed topic you don't want to split up into single pages because every chapter is in the size of a couple of lines.

The solution are in page links. There are two ways of doing this. The old anchor way or the new xhtml compliant way.

Old stuff first
This is not recommended anymore because not all browsers support the anchors anymore.
Place the anchor:
 <a name="headline1">This Is About Deprecated Anchors</a>  
Place the Link:
 <a href="#headline1">Anchors</a>  

New XHTML Compliant
Target:
 <div id="headline2">  
    The New Way To Code In-Page-Links  
 </div>  
Link:
 <a href="#headline2">the new way</a>  
Link from another web page:
 <a href="anotherwebpage.html#headline2">the new way</a>  

Getting Started With Android: Part3 - User Interface

In this part I will show you how the UI is build up.

You have two options, declarativ or programatic. Both have there benefits and drawbacks, in some cases it is impossible to declare it. But your first and preferred option should be the declarativ way.

Declarativ
Benefits:

  • Clean separation of logic and UI
  • Usage of the visual designer.

The UI is declared in a XML layout file. All the layout files of an application are stored in the res/layouts folder.
The default layout file that gets created for every new application is called main.xml.
Lets have a look into ours. If you double click on the file in the resource tree, the visual designer will open up. It takes some time but you have a nice graphical representation of it.


For the moment we are more interested in the plain xml. Switch the bottom tabs from 'Graphical Layout' to 'main.xml'.

 <?xml version="1.0" encoding="utf-8"?>  
 <LinearLayout xmlns:android="http://schemas.android.com/apk/res/android"  
   android:orientation="vertical"  
   android:layout_width="fill_parent"  
   android:layout_height="fill_parent"  
   >  
      <TextView   
        android:layout_width="fill_parent"   
        android:layout_height="wrap_content"   
        android:text="@string/hello"  
        />  
 </LinearLayout>  

Layouts
LinearLayout is a layout type. There are a lot of layout types like:

  • LinearLayout
  • RelativeLayout
  • FrameLayout
  • TableLayout

Layouts are containers for other Views that arange their child Views in different ways.

Views
TextView is a class that derives from View. Views are the basic classes for the UI. Even Layouts are derived from View.

  • TextView
  • ImageView
  • Button

To assign a layout to an Activity we have a look into our HelloWorldActivity from Part2. We find the callback method onCreate(). That is called from the Activity at the time it changes from the state Create to Running. This happens exactly once in the life cycle of every Activity.
Here we initialize our Activity.
In line 4 we tell the Activity that it should inflate from the resources the R.layouts.main layout.

1:  @Override  
2:  public void onCreate(Bundle savedInstanceState) {  
3:      super.onCreate(savedInstanceState);  
4:      setContentView(R.layout.main);  
5:  }  
To get access to the inflated Views the View must have an id. Go to the layout and add android:id="@+id/text1" to the tag of the TextView.

 <TextView android:id="@+id/text1"  
        android:layout_width="fill_parent"   
        android:layout_height="wrap_content"   
        android:text="@string/hello"  
        />  

Now you can use the method findViewById() to obtain the instance of your desired view.

 TextView textView = (TextView)findViewById(R.id.text1);  


Programatic
Benefits:

  • Allows you to build up dynamic UIs like a month view of a callendar

The same UI as above looks coded like this.

   public void onCreate(Bundle savedInstanceState) {  
     super.onCreate(savedInstanceState);  
 //    setContentView(R.layout.main);  

     LinearLayout layout = new LinearLayout(this);  
     layout.setLayoutParams(new LayoutParams(
          LayoutParams.MATCH_PARENT, LayoutParams.MATCH_PARENT));  

     TextView textView = new TextView(this);  
     textView.setText("Hello World, HelloWorldActivity!");  
     textView.setLayoutParams(new LayoutParams(
          LayoutParams.MATCH_PARENT, LayoutParams.WRAP_CONTENT));  

     layout.addView(textView);  
     setContentView(layout);  
   }  

As you can see, the layout parameter are lengthy and the code completion for the parameters that you have in the xml layout file is missing.

Tuesday, September 20, 2011

How To Open Chrome With A Set Of Tabs

If you are like me you want to open your browser and getting a specific task done. Here are two examples.
1. I want to research on some topics and aggregate the result in a document. Therefore I need open a tab with wikipedia and one with google docs.
2. Or I want to write a new post in my blog. Therefore I need 4 tabs one with the dashboard of the blog, one for the blog itself, google docs for my research/outline and a dictionary.

Wouldn't it be nice to open up the browser with the tabs for a special task opend? No boring searching and clicking all the bookmarks!

The solution ist to start chrome with the parameter --homepage <url>

To do this, go to the chrom icon on your desktop. Right click and make a short cut. Rename it like your task, in my case 'blogging'.


Right click on one and choose preferences.


Go to the property 'target' and add at the end of the line the argument.
It should look like this:

C:\Users\work\AppData\Local\Google\Chrome\Application\chrome.exe --homepage http://www.blogger.com/stats2.g?blogID=2438166163329174006 http://strangeoptics.blogspot.com/ https://docs.google.com/?hl=de&tab=wo&authuser=0#home http://dict.leo.org/ende?lp=ende&la

You can add as much websites as you want, separated by a blank.

Links to the guys from Chrom:
The Chromium Projects - Run Chromium with switches
List of chromium command line switches

Potato-Egg-Salat

There are a million of potato salat recipes but this is one of my favorites.


Ingrediens: 2 Persons
250 g potatoes, sliced
2 green onion, sliced
2 pickeld cucumber, diced
6 radish, diced
2 boiled eggs, diced
some chive

Dressing:
1 Tbsp oil
150 g yoghurt
1 Tbsp lemon juice
1 Tbsp vinegar or pickeld cucumber juice
1 teaspoon sugar
salt, pepper

Preparation:
Put all ingrediens together in a bowl.
Mix all dressing ingidiends together and pour it over the salat and stir it.
Leave it in the fridge for half an houre until the dressing is soaked in.
Serve cold.


Print this post

Saturday, September 17, 2011

Best Of Short Cuts For Eclipse: Ctrl + Shift + L

These are my most important short cuts after 8 years of busy java coding.
Increase your productivity and impress your coworker.

I will show you the predefined short cuts, how to define your own and the way to reuse them in all your eclipse IDE's.


Predefined Bindings
You can find an official overview of the predifined short cuts by clicking under Help -> Key Assist or more apropriate with the following short cut Ctrl + Shift + L.

Changing the code:
Ctrl + D Delete Line
Ctrl + Alt + Up/Down Duplicate Lines
Alt + Up/Down Move Lines
Alt + Shift + R Rename - Refactoring
Ctrl + Z Undo
Ctrl + Y Redo
Ctrl + Shift + O Organise Imports
Ctrl + Shift + F Format
Ctrl + Space Content Assist
Ctrl + 7 Toggle Comment

Navigating the code:
F3 Open Declaration
Ctrl + mouse over Open Declaration, (Super) Implementation
Ctrl+T Quick Hierarchy (like above without a mouse)
F4 Type Hierarchy
Ctrl + Shift + T Open Type
Ctrl + K Find Next
Ctrl + Shift + K Find Previous
Alt + Left Backward History
Alt + Right Foreward History
Ctrl + Alt + H Open Call Hierachy

Organise Imports
Be aware, it removes static imports like the handy one for junit
import static org.junit.Assert.*;
There are two solutions:
1. You can fix this by going to Window -> Preferences -> Java -> Code Style -> Organize Imports
There you change in the field 'Number of static imports needed for .*' the number of 99 to 1.
This is the number of static import statements that are allowed for static members of the same type before type is used.
2. Another way is to use the favorites of the content assist function.
Go to Window -> Preferences -> Java -> Editor -> Content Assist -> Favorites.
Enter a 'New Type...' like 'org.junit.Assert.*'.
When you use the next time the auto complete Ctrl + Space the it will propose those static members even if the import is missing.

Format
You can find the configuration under Window -> Preferences -> Java -> Code Style -> Formatter


Custom Bindings
Go to Window -> Preferences -> General -> Keys
Alt + W P 'keys' down down

Here you can look up all available commands and their key binding. Look at the command 'Activate Editor' it has a binding for the key 'F12'. One line above, the command 'About' doesn't got one.

We will add one binding step by step. In the filter field 'type filter text' type in 'generate'. Now the list shows 5 items. Select the command 'Generate Getters and Setters'.
Go to the 'Binding' field. As you start to press a button it will come up there with a trailing +.
If you press a combination of keys they get conncatenated in the order you pressed them with the +.
For generating getters and setters I would naturaly choose Ctrl+Shift+G.
This will lead to a conflict with the command 'References in Workspace'. Resolve it by choosing another key combination : Ctrl+Shift+S

Suggested:
Ctrl+Shift+S Generate Getters an Setters
Ctrl+Shift+E Show In (Package Explorer)


Reuse

Go to File -> Export... -> General -> Preferences.
Choose "Export all" or just "Keys Preferences".
To import them works the same way.

Friday, September 16, 2011

Getting Started With Android: Part2 - Hello World

In this part I show you how to create a project and to start it either in the emulator or on your phone.

Click on the new button in the upper left corner.


In the next dialog choose the 'Android Project' wizard.


Now you have to give the Project a name. If you want to use the package name like I do usually, have a look at the Activity name. It is automaticaly derived from the project name but with the first letter in high case.
org.android.helloworld  will get Org.android.helloworldActivity.
Fix it by hand or don't use the package as the project name.


The resulting project structure looks like the following picture. I will tell you later about it.


Hit the debugg or run button.


The emulator starts. 


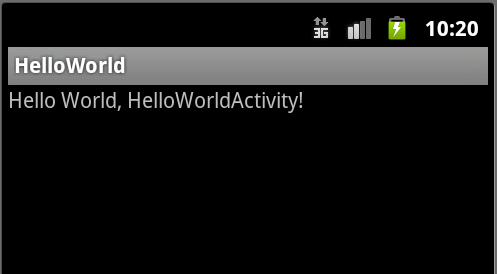
Drag the locker icon to the right. The screen shows your hello world app.


Viola your are done.

Wednesday, September 14, 2011

Cooking: Chili Sin Carne

This is the vegetarian version of chili con carne.

Ingridiends:
150 g unripe spelt grains or just bulgur
600 ml vegetable stock
3 onions
3 cloves garlic
800 g canned tomatos
300 g canned corn
300 g canned kidney beans
3 Tbsp oil
1 teaspoon paprika powder
2 teaspoons tomato purée
2 teaspoons cummin, grounded
1 chili
2 capsicum


Cook the unripe spelt grains with the vegetable stock for about 30 minutes.
Pour the stock into a bowl and put it aside.

Chop the onions and the garlic into small pieces.
Heat oil in a deep pan and sauté the onions until soft add the garlic and cook for 2 more minutes.
Dice the capsicum mean while.
Add the grains and fry it for a short time.
Now add the rest, tomato purée, paprika powder, cummin, tomatos, corn and the beans.
Simmer it for 20 minutes.
Add as much of the stock as you like.


Monday, September 12, 2011

Java: Sorting objects by multiple attributes

The best way to do this is by using the ComparatorChain from the Apache Collections Framework.
You have to implement for every attribute a Comparator that you add to the Chain in the order you need. Now you can use the chain like a normal Comparator.
Here is how it looks like in code:
 package org.test.comparator;  
 public class Person {  
      public Person(String name, int age) {  
           this.name = name;  
           this.age = age;  
      }  
      public String name;  
      public Integer age;  
      @Override  
      public String toString() {  
           return "[" + name + "|" + age + "]";  
      }  
 }  

 package org.test.comparator;  
   
 import java.util.ArrayList;  
 import java.util.Collections;  
 import java.util.Comparator;  
 import java.util.List;  
   
 import org.apache.commons.collections.comparators.ComparatorChain;  
   
 public class TestComparatorChain {  
      public static void main(String[] args) {  
           List<Person> persons = new ArrayList<Person>();  
           persons.add(new Person("stan", 31));  
           persons.add(new Person("kyle", 22));  
           persons.add(new Person("stan", 11));  
           persons.add(new Person("kyle", 30));  
             
           Comparator<Person> comparatorName = new Comparator<Person>() {  
                @Override  
                public int compare(Person o1, Person o2) {  
                     return o1.name.compareToIgnoreCase(o2.name);  
                }  
           };  
             
           Comparator<Person> comparatorAge = new Comparator<Person>() {  
                @Override  
                public int compare(Person o1, Person o2) {  
                     return o1.age.compareTo(o2.age);  
                }  
           };  
             
           ComparatorChain chain = new ComparatorChain();  
           chain.addComparator(comparatorName);  
           chain.addComparator(comparatorAge);  
             
           System.out.println(persons);  
             
           Collections.sort(persons, chain);  
             
           System.out.println(persons);  
      }  
 }  

Resulting two lines:
[[stan|31], [kyle|22], [stan|11], [kyle|30]]
[[kyle|22], [kyle|30], [stan|11], [stan|31]]

The commons-collections-3.2.1.jar is with 575 kb quite big if you only want to use one class of it. Fortunately the class ComparatorChain has no dependencys to other classes of the collections library.
Download it from here and copy it into you project but keep the original package name org.apache.commons.collections.comparators, it helps you later to track back where the class came from.

Sunday, September 11, 2011

Vegan Black Metal Chef

One of my favorite cooking shows is the "Vegan Black Metal Chef".


Vegan Black Metal Chef - Episode 1 - Pad-Thai

Vegan Black Metal Chef - Episode 2 - Easy Meal Ideas of The Ages

Vegan Black Metal Chef - Episode 3 - Tempura de Aspargos e Sushi

Vegan Black Metal Chef - Episode 4 - Hail Seitan

Getting Started With Android: Part1 - The Setup

This is a very quick and lazy guide because the process is easy and well documented at the sites of the respective developers. I recommend to read the official installation guides at the time of a second installation to understand all the details that I left out.

You will need:
  1. Java Development Kit (JDK)
  2. Android Software Develpmet Kit (Android SDK)
  3. Eclipse (IDE)
  4. Android Development Tools (ADT) plugin for Eclipse
  5. Connect Eclipse with the Android SDK

1. JDK
Get the latest JDK and start the jdk-7-windows-i586.exe.
Afterwards set the JAVA_HOME environment variable. The path should look like:
c:\Program Files\Java\jdk1.7.0\.

2. Android SDK
Get the latest Android SDK. Use the installer or the binary. However the SDK will endup in a folder on your computer that has no reference to the OS or what so ever. This means, you can place it where ever you want and move it later without losing dependencies you don't know of.
I recommend to put it into a folder like:
c:\Programming\android-sdk.
If you put into the c:\Program Files\... be aware that you have to start the installer with admin rights.
Leave out the version number for the folder name. The SDK can update itself and the folder wouldn’t reflect its truth content.
Start the 'SDK Manager.exe' to open the Manager. If you are in the folder 'Program Files', start it by right click and choose 'As Admin'.  It will automatically popup a dialog and ask you to choose from the available SDKs to download. Select all and hit download.
The folder is initially around 60 Mb in size. The downloading takes about 1 hour and will fill you folder up to 1.2 Gb.


3. Eclipse (IDE)
Get the latest Eclipse. I take the package ‘Eclipse for RCP and RAP Developers’. The file you will get is a zip like eclipse-rcp-indigo-win32.zip. Unpack it where ever you want. It has no installer and you can start it right away.
At the first start the IDE asks you to specify the location of your workbench. I put it always inside the eclipse folder and use a relative path.

The benefits are to avoid using the workspace with different IDE versions and I can move the whole project whereever I want in one peace.

4. ADT
Is a Eclipse plugin and can get obtained in the official Eclipse manner.
Select the Help -> Install new Software...
Click ‘Add...’
Name: ADT Plugin
Location: https: https://dl-ssl.google.com/android/eclipse/
Select all available plugins.

Install it and restart the IDE and you should see the following new icon in your coolbar.


5. Connect Eclipse with the Android SDK
Select Window -> Preferences
Click the new Node 'Android'
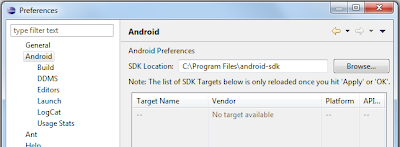
At the right side you have to specify the path to the Android SDK you have installed in step 2.


You should get an error that the 'SDK Platform Tools component is mising' but this is normal, you have to download it first.


Click the new Button in the coolbar. This will open the 'Android SDK and AVD Manager'.


Saturday, September 10, 2011

Android: How To Create A ContextMenu

I have a custom View in which I want to show a dynamic ContextMenu. It was hard to figure out the steps to do because most of the tutorials show only how it works with Views from the framework like the ListView.
The missing part is how my view could trigger the onCreateContextMenu() callback.

As an overview, here are the steps in pseudo code:
  1. Activity.registerForContextMenu(customView);
  2. CustomView.showContextMenu();
  3. Activity.onCreateContextMenu(ContextMenu menu, View v, ContextMenuInfo menuInfo);
This works pretty well only the parameter menuInfo is null.
If the method is invoked by a framework class you will get a class that is derived from ContextMenu.ContextMenuInfo which holds additional information about the caller.
In the case of a ListView the class is called AdapterContextMenuInfo and holds 3 Information.

  • calling view
  • position in the list
  • id

Wouldn't it be nice to provide custom MenuInfo from your custom View? As far I havn't found a way.

The next step is to call the showContextMenu() methode from a onLongClick listener like I described in one Post before.
Unfortunately this is not realy possible under some circumstances.

If you want to start a context menu with the long click event on a custom view with your own dragging and zooming routines, it is nearly impossible.
The problem is that you have to distinguish between a finger that stays on one place and one in motion until the long click is recognized.
The only way to figure out motion or not is to cache the MotionEvent at ACTION_DOWN time and at ACTION_MOVE time. Than you have to calculate the spacial delta.
But the onLongClick event is triggered microseconds after ACTION_DOWN with no chance ever to get a ACTION_MOVE event.

Friday, September 9, 2011

How To Post Source Code In A Blog

Sourcecode Formatter

http://codeformatter.blogspot.com/2009/06/about-code-formatter.html

The result looks like this, optional you can format it with line numbers but for the reader there is no easy mechanism to remove them if he wants the lines in his project.

 public class Robot {  
      private Gun gun = new Gun();  
      public void killAllHumans() {  
           gun.fire();  
      }  
 }  

Android: How To Figure Out A Long Click

I was looking for a way to recognize a long click on a custom view.

My first idea was to use the onTouchEvent(MotionEvent event) callback.
The only thing I have to do is to capture the time at the MotionEvent.ACTION_DOWN event and calculate the time difference inbetween an other event. Is it bigger than lets say 1 second it is a long click.
But what could be the next event? ACTION_UP comes whenever. And ACTION_MOVE indicates a gesture like drag but not a long click.
Do I have to implement a Thread?

The answer is realy easy. There is an official event for the job. You can register the View.OnLongClickListener to every View.
The listener gets either called by a user touch or you can call it programmatically with the performeLongClick() method.
Here comes an example that registers the listener on a button and sets a string into a TextView to have a visual feedback.

 button.setOnLongClickListener(new View.OnLongClickListener() {  
      @Override  
      public boolean onLongClick(View v) {  
           textView.setText("long clicked");  
           return true;  
      }  
 });  


Caution!
There are two things to keep in mind.
1. If you like me developing a custom view you probably override the onTouchEvent() methode.
 @Override  
 public boolean onTouchEvent(MotionEvent event) {  
      // TODO Auto-generated method stub  
      return super.onTouchEvent(event);  
 }  
Don't remove the super.onTouchEvent(event) regardless what you return. It triggers the whole event processing of the parent view. If you leave it out the onLongClick event will never occur.

2. If you return true with the onLongClick(View v) method you tell the view the click is handled and a registered ContextMenu won't come um.

Getting Started With Android: Part0 - Why

As a java programmer Android is the ultimate platform to develop applications.
It is component based with the ability to reuse lot of stuff one self or other people created.
After desktop application, that are restricted to one place, came the web 2.0 where you can use applications everywhere in the world with an existing computer and Internet connection and finally comes mobile processing power virtually everywhere in your hand.
There are a lot of sensors with standard APIs to interface with like a camera, compass, accelerometer, orientation, …
If you intend to sell an application, put your App into the Market with a minimum of effort and reach million of people.

The downside is the not so well documented API that gives you headaches for simple things like making the options menu dynamic or using the grapics interface to map touch inputs to scaled or translated objects you draw onto a canvas. The list goes on.

To share the fun and the tricks I have learned is the reason for this tutorial.

Thursday, September 8, 2011

Really Useful Cooking Links

Rezepte-Wiki
A wiki with lot of recipies that are not only from one person like most of the other recipe sites. Here the recipes get improved by a big community. Here are my edits.

Simply Recipes Food and Cooking Blog

Really Useful Microcontroller related Links

hack a day
The best blog about hardware hacks.

Mikrocontroller.net
German site that covers everything about microcontroller. And when I say everyting I mean it. Loads of tutorials and even more forums.

arduino
This is THE prototyping platform for microcontrollers with tons of tutorials.
It has its one Java related programming language that abstracts lots of the complicated stuff for the people that just want to interface with hardware.
And comes with an development environment.

Really Useful Eclipse Links

This is a collection of my best links to Eclipse related stuff.

Code / Tutorials
vogella
Most comprehensive tutorials about eclipse topics in the web.

SWT Snippets

JFace Snippets

New Widgets
Nebula Project
NatTable
PFGrid-Toolkit

Really Useful Android related Links

This is a collection of my best links to Android stuff.

Amarino
The base line is 'android meets arduino'. It is a toolkit, consisting of an Android application and an Arduino library which will help you to interface with your phone in a new dimension.