Friday, October 21, 2011

Generating Traffic For Your Blog

I have my blog for nearly two month now. My statistics show me 500 page views whats nice. But when I look at the traffic sources 80% comes from stackoverflow where I postet some links to some of my postings. There is nearly no traffic from search engine requests.

The first good idea to find out what is happening is to look at this site:
http://www.wholinks2me.com


This means only 26 of my 35 posts are actually indexed from google and the other two big search engines are unaware of me.

Search engine submission
Submit your blog to all search engines manually:
https://ssl.bing.com/webmaster/SubmitSitePage.aspx
https://siteexplorer.search.yahoo.com
http://freewebsubmission.com/

Sitemaps
Sitemaps are xml documents that allows you to inform search engines which pages should get crawled. If you are using blogspot, the automatic generated sitemap contains only 26 of your most resent pages.
To get all of your postings indexed, submit your own sitemap.
This can be done in the google webmaster-tools.

Add your blog.
Go to 'website-configuration' and there to 'xml-sitemaps'.
Hit the button 'submit xml-sitemap'
In the dialog insert the following link to your atom feed.

 atom.xml?redirect=false&start-index=1&max-results=500  

If you got more than 500 pages add them subsequently in 500 blocks.

 atom.xml?redirect=false&start-index=501&max-results=1000  
 atom.xml?redirect=false&start-index=1001&max-results=1500  

Tuesday, October 18, 2011

Android: How The Preference Framework Works

Every good application needs preferences that enables the user to customize and personalize it to his needs.
Android provides us with a preference framework ready to use. Like the rest of the UI, you have the choice to define your preference declaratively or programmatically. Android stores the preferences as key-value pairs of primitive data types in a shared preferences object.


Example
We will develope a preference activity consisting of two categories, each with a preference in it. The first categorie is defined declarativeley in an XML document while the second is defined programmatically.

The declarative Way of creating preferences
Start a new Android project like I described it in Part0-2 of my 'Getting Started With Android' tutorial.

At first we have to layout the preference screen through an xml file. This file comes by convention in the folder res/xml that we have to create.

Create a new 'Android XML File' from the context menue of the folder. When the dialog pops up, select the resource type 'Preferences', name it my_preferences.xml and choose PreferenceScreen as the root element.

 <?xml version="1.0" encoding="utf-8"?>  
 <PreferenceScreen  
      xmlns:android="http://schemas.android.com/apk/res/android">  
 </PreferenceScreen>  

The preferences UI consists of three basic class types.
PreferenceScreen
It is a container type. It can hold childs of the type PreferenceCategory, Preference and even PreferenceScreen itself to build up a nested preference UI.
PreferenceCategory
Groups Preferences together under one common title.
Preference
The actual preference that is a build in (EditTextPreference, CheckBoxPreference, ...) or custom preference.

 <?xml version="1.0" encoding="utf-8"?>  
 <PreferenceScreen  
      xmlns:android="http://schemas.android.com/apk/res/android"  
      android:key="prefscreen">  
   <PreferenceCategory   
        android:title="category 1"   
        android:key="@string/pref_cat_1_key">  
     <EditTextPreference   
          android:key="@string/pref_edittextpreference_key"   
          android:title="EditTextPreference"   
          android:dialogTitle="EditTextPreference"   
          android:dialogMessage="message"   
          android:summary="summary"/>  
   </PreferenceCategory>  
 </PreferenceScreen>  

For the sake of getting things done quick in tutorials I used plain strings and not the string.xml from the resources.
To bring the my_preferences.xml to the screen, extend an Activity from the class PreferenceActivity. In the onCreate() methode, inflate the ui from the file.

 public class MyPreferenceActivity extends PreferenceActivity {  
      @Override  
      protected void onCreate(Bundle savedInstanceState) {  
           super.onCreate(savedInstanceState);  
           addPreferencesFromResource(R.xml.my_preferences);  
           EditTextPreference etpUsername = (EditTextPreference)
                      findPreference(getString(R.string.pref_edittextpreference_key));  
      }  
 }  

Dont't forget to add the Activity via the AndroidManifest.xml otherwise the app will crash when it can't find it.

 <activity   
      android:name=".MyPreferenceActivity"   
      android:label="Preferences">  
 </activity>  

Now we have to implement the code that opens the MyPreferenceActivity from the options menue.
Create a new menu file 'my_menu.xml' in the folder res/menu.

 <?xml version="1.0" encoding="utf-8"?>  
 <menu  
  xmlns:android="http://schemas.android.com/apk/res/android">  
   <item android:title="@string/menu_item_preferences"   
        android:id="@+id/menu_preferences"   
        android:icon="@android:drawable/ic_menu_preferences"/>  
 </menu>  

In the main Activity we override the following callback methods.

 @Override  
   public boolean onCreateOptionsMenu(Menu menu) {  
        super.onCreateOptionsMenu(menu);  
        MenuInflater mi = getMenuInflater();  
        mi.inflate(R.menu.my_menu, menu);  
        return true;  
   }  
   @Override  
   public boolean onMenuItemSelected(int featureId, MenuItem item) {  
        switch(item.getItemId()) {  
             case R.id.menu_preferences:  
                  Intent i = new Intent(this, MyPreferenceActivity.class);  
                  startActivity(i);  
                  return true;  
        }  
        return super.onMenuItemSelected(featureId, item);  
   }  

Start your Application and have a look at our new preferences screen with the first category.

The programmatic Way of creating preferences
Go back to the MyPreferenceActivity and add the following lines at the end of the onCreate() methode.
They will add a second PreferencCategory called 'category 2' with a CheckBoxPreference in it.

     protected void onCreate(Bundle savedInstanceState) {  
         ...  
         PreferenceManager preferenceManager = getPreferenceManager();  
         PreferenceScreen preferenceScreen = 
                  (PreferenceScreen) preferenceManager.findPreference("prefscreen");  
         PreferenceCategory prefCat2 = new PreferenceCategory(this);  
         prefCat2.setTitle("category 2");  
         preferenceScreen.addPreference(prefCat2);  
         CheckBoxPreference checkBoxPreference = new CheckBoxPreference(this);  
         checkBoxPreference.setTitle("CheckBoxPreference");  
         checkBoxPreference.setSummary("summary");  
         prefCat2.addPreference(checkBoxPreference);  
     }  

With the help of the PreferenceManager we can obtain any preference that is declared so far. We fetch the PreferenceScreen because we want to add another PreferenceCategory at the end. To create an object of one of the preference types, just call the constructor of its class.
Plugging together the hierachy is done with the addPreference() method.

Start your Application and have a look at our new preferences screen.

Sunday, October 16, 2011

Cooking: Cauliflower Mushroom (Krause Glucke)

Today I found my biggest cauliflower mushroom ever.


They grow as parasites on the roots of trees. I found them only on conifers expecially on pine trees and there, very close to the trunk.


I had to make a trophy photo to demonstrate the huge size.


At home you have to cut it into smaler pieces to clean it.


This species is more dirty and harder to clean than any other mushroom.


I prefer to browse it with a shower head. The water should be cold.


But you can't get it super clean. There will be always some soil.
Pick out the big stuff like pine needles, pieces of bark or moth cocoons.


Cut the mushroom into finger thick slices and build up a schnitzel factory. Bath the slices in the scrambled egg and coat it with bread crumps.


Heat oil in a pan and fry the mushroom schnitzel until the pieces are dark brown.


Synonyms: sparassis crispa, cauliflower mushroom, krause glucke, fette henne

Friday, October 14, 2011

Using OSM data in GeoServer: Part3 - GeoServer

To install GeoServer you have a lot of options:


I choose the WAR because I want to extend the funktionality of the server later on (Not in this tutorial).
Go to the download page and get the stable WAR and unzip it.

geoserver-2.1.2-war.zip
geoserver.war

A WAR gets deployed into an application server. Also here you got a lot of options:


I choose GlassFish. Go to the download page and get the newest open source version.

glassfish-3.1-windows.exe

Installation folder C:\glassfish3
Http port 8080
Admin port 4848
start command C:\glassfish3\glassfish\bin\asadmin.bat start-domain domain1

Go to the admin site and deploy the GeoServer WAR.
Open your browser and type in 'http://localhost:4848'.
Click on Applications and there on the 'Deploy...' button.
Choose the geoserver.war ond click 'OK'.

Open the page 'http://localhost:8080/geoserver'.


The default username and password ist admin and geoserver.

If you want to know how GeoServer generally works I recomend to read the excellent GeoServer User Manual.

Now we want to bring the spacial data into the browser.

Go to 'Workspaces'.
Click 'Add new workspace'

Name osm
Namespace URI http://osm.de


Go to 'Stores'.
Click 'Add new Store'.
Click 'PostGIS - PostGIS Database'.

Workspace osm
Data Source Name osm data
host localhost
port 5432
database osm
user osmuser
passwd ***

Now you have to create for every table a layer.

Go to 'Layers'.
Click 'Add a new resource'
Choose 'osm:osm data'.

In the Tab 'Data' go to the point 'Bounding Boxes' and compute the native- and Lat/Lon bounding boxes from data.
Check in the Tab 'Publising' if the 'Standard Stil' is point for planet_osm_point and line for planet_osm_line, planet_osm_roads and polygon fro planet_osm_polygon.
Click 'Save'.

Go to 'Layer Groups'.
Click 'Add new layer group'
Name: osm group
Click 'Add Layer...' and add all 4 layers.
Click 'Geerate Bounds'.
Click 'Save'

Go to 'Layer Preview'.
Find the osm group and click 'OpenLayers'.


Using OSM data in GeoServer: Part2 - osm2pgsql

For this part we have to:

  1. get the OpenStreetMap(OSM) data that are called planet files.
  2. download the import tool osm2pgsql.
  3. import the osm data.

The OSM wiki has a page that describes how to download their data.
We choose geofrabrik. In the folder osm/europe/germany wie click on hessen.osm.bz2. This file is not to big (121 MB) for this example. Germany would take the whole day to import.


For osm2pgsql exist a compiled version to download from here.

 osm2pgsql -U postgres -W -c -s -d osm -S default.style hessen.osm.bz2  

The parameters:
-U Postgresql user name.
-W Force password prompt.
-c Remove existing data from the database.
-s Store temporary data in the database. This greatly reduce the RAM usage but is much slower. You are running this on 32bit system, so at most 3GB of RAM will be used. If you encounter unexpected exceptions during import, you should try this switch.
-d The name of the PostgreSQL database to connect.
-S Location of the style file. Defaults to /usr/share/osm2pgsql/default.style.

The import takes around 30 minutes.

Have a look in the osm-db. 5 new tables are there.
planet_osm_line
planet_osm_point
planet_osm_polygon
planet_osm_roads

In the next part I will show you how to visualize the date with GeoServer.

Using OSM data in GeoServer: Part1 - PostGIS

The first thing we need is a data base to store spacial data. Today ever big vendor has a spacial extension that is compliant with the simple feature specification from the OGC.
We could choose from the following data bases:
Oracle, MSSQL, MySQL, Postgres, ...

I pick Postgres with its spacial extention called PostGIS. It is an stable open source data base with no costs. This is the only data base I know for which a tool exists to import the osm data. It is called osm2pgsql.
  1. Download and install PostgreSQL.
  2. Update or manually install PostGIS
  3. Create a spacial db called osm with a new user
  4. Configure the connections

1. Download and install PostgreSQL

Get the one click installer from the download page. I choose the version 8.4 instead of the 9.x branch because it gots all the funktionality we need and it is the most stable and secure version.

One click it : postgresql-8.4.9-1-windows.exe

The installer will promt you:
Installation Directory: C:\Program Files\PostgreSQL\8.4
Data Directory: C:\Program Files\PostgreSQL\8.4\data
Password: <your password>
Port: 5432

At the end you get asked if you want to launch the Stack Builder.
Choose from the category tree 'spacial extensions' and then 'PostGIS 1.5'.

Alternatively you can install the extention by hand. There are instructions at the PostGIS site.

Open up the 'pg Admin III' tool from your start menue. In the objectbrowser you will find a data base called 'template_postgis' with two tables 'geometry_columns' and 'spacial_ref_sys'. If you need a new gis data base you use this as a template. So don't alter it.


Create a new Login-Roll called osmuser by right clicking on 'Login-Rollen'.
Create a new gis data base by right clicking on 'Databases' in the Tree.
Name: osm
Owner: osmuser
Template: template_postgis
Finaly you have to assing the osmuser to the tables in the data base.

This can also be done by the postgres console.

Now you are ready with the basic data base setup. Next part will show you how to import the osm data.

Using OSM data in GeoServer: Part0 - Introduction

In this tutorial I want to show you how we can setup our own OpenStreetMap(OSM) tiling server.
Most of the tutorials are writen for linux, I will use windows instead.

Several steps have to be done:
  1. Setting up a data base (PostGIS)
  2. Download and Import the OSM data via an importing tool (osm2pgsql)
  3. Setting up a GIS-Server (GeoServer) and generating the map tiles

Wednesday, October 12, 2011

Really Useful Java Data Visualisation And Charting Links

This is a collection of my favorite Java libraries for data visualisation, diagrams, charting and graphs.

JFreeChart
I use it for a small project (hotstock) of mine where I want to keep track of the stock market development.


prefuse


If you are an RCP developer or using SWT standalone, you might use the following libraries. They will blend into your projects.

Zest


Used to draw graphs and got the most important layouts.

GEF (MVC)


You can draw interactive diagrams an expand them to an full working editor that uses the MVC pattern.

Thursday, October 6, 2011

Steve Jobs Died Today


Made from MacBook parts.


I was never a big fan of the restrictiv Apple strategy and the Steve Jobs hype until I saw this video on TED earlier this year. Great story.

Cooking: Parasol Mushroom (Schirmpilz)

The parasol mushroom is very common, easy to spot, hard to misstake and got a unique yummy taste.
It is best to treat it like a schnitzel. Clean it, bath it into a bowl of scrambled eggs and coat it with bread crumbs.
Put enough oil in a pan and fry it till deep brown.


Synonyms: Macrolepiota procera, parasol mushroom, schirmpilz

Tuesday, October 4, 2011

Eclipse: Exclude Packages From Autocomplete and Organize Imports

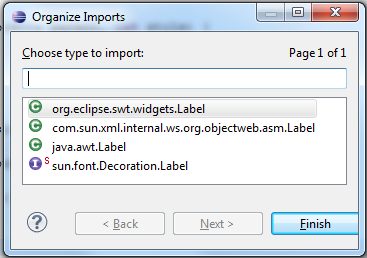
If you are programming SWT there are allways this nasty AWT classes that come up when using the autocomplete (Ctrl + Space) or organize imports (Ctrl + Shift + O). Sometimes they are even in the first line of the result.


If you want to get ride of it or other undesireable packages use Type Filters.

Preferences -> Java -> Appearance -> Type Filters
Add... the  java.awt.*  package.

Music From A Single Line Of C-Code


Now there are coders experimenting with “oneliners,” programs of around 16 bytes in size that accomplish what they need to in a single line of C. By running the code through an 8 kHz audio channel, demoscener viznut and others discovered these raw loops of entrancingly garbled computer music.

Cooking: Common Puffball (Flaschenstäubling)

This mushroom is one I collected never before. The wood is full of this little ones and it would be a shame to leaf them out. It is a good edible mushroom when young and insde homogeneous and white.
You can fry it with onions or use it in a soup.


Synonyms: Lycoperdon perlatum, common puffball, warted puffball, gem-studded puffball or devil's snuff-box