Saturday, February 15, 2014

Picory The Android Memory Game

For all of you with and android phone that have kids, here is my memory game for you.

It is no ordenary memory game where you have only one or a couple of preinstalled and fixed card sets.
With this app you can create you own card sets that fit to your kids needs and share them with friends.
You can make one with all your family members or there beloved comic characters or ... educational things you wanna teach them.


Android app on Google Play

Friday, October 26, 2012

How To Dynamically Set The Radius Of A Feature Point To Reflect The Spacial Dimension In OpenLayers

If you draw a feature point in OpenLayers it keeps in ever zoom level the same size. Like the one on the right site shown in the map below.
Wouldn't it be nice to to give the feature point a physical size that reflects its spacial dimension in relation to the map?
This is done with the point on the left side. Zoom in or out and you will see the difference.


Hier is how its done.
1:  var map, layerOsm, layerVector;  
2:  var lonLatFrankfurt = new OpenLayers.LonLat(966375, 6466128);  
3:    
4:  function initOpenLayers() {  
5:         
6:       map = new OpenLayers.Map('map');  
7:         
8:       layerOsm = new OpenLayers.Layer.OSM("Simple OSM Map");  
9:       map.addLayer(layerOsm);  
10:         
11:         
12:       var layerVectorNormal = new OpenLayers.Layer.Vector("layer normal");  
13:       map.addLayer(layerVectorNormal);  
14:         
15:       var featureOffenbach = new OpenLayers.Feature.Vector(new OpenLayers.Geometry.Point(976375, 6466128));  
16:       layerVectorNormal.addFeatures([featureOffenbach]);  
17:         
18:       var style = OpenLayers.Util.extend({}, OpenLayers.Feature.Vector.style.default);  
19:       OpenLayers.Util.extend(style, {pointRadius: '${calculateRadius}'});  
20:         
21:       var styleArea = new OpenLayers.Style(  
22:                 style  
23:            ,  
24:            {  
25:                 context: {  
26:                   calculateRadius: function(feature) {  
27:                           return feature.attributes.radius/feature.layer.map.getResolution();  
28:                   }  
29:                 }  
30:             }  
31:       );  
32:    
33:       var sm = new OpenLayers.StyleMap({  
34:            'default': styleArea  
35:       });  
36:         
37:         
38:       layerVector = new OpenLayers.Layer.Vector("layer spacial dimensioned", { styleMap: sm });  
39:       map.addLayer(layerVector);  
40:    
41:       var feature = new OpenLayers.Feature.Vector(new OpenLayers.Geometry.Point(lonLatFrankfurt.lon, lonLatFrankfurt.lat), {radius: 7000});  
42:       layerVector.addFeatures([feature]);  
43:         
44:       map.setCenter(  
45:            lonLatFrankfurt,  
46:            10  
47:       );  
48:  }  
And now the explanation:
In line 41 we create a point feature with the additional property radius that holds the radius of the point in meter.
 OpenLayers.Feature.Vector(geometry, attributes)  
The attributes will be mapped to the attributes property of the vector object.

Than we create our Style with
 OpenLayers.Style(style, options)  
The parameter style ist an anonymous object of key-value-pairs that is also refered to as symbolizer. A list of valid properties is defined in OpenLayers.Feature.Vector.

We want to extend the original style and just change the pointRadius property. In line 18: we extend the the original default symbolizer.
 OpenLayers.Util.extend(destination, source)   
This function copies all properties from source to destination.

In line 19: we do something that is called attribute replacement. With the expression:
 ${attribute_name}  
With this expression, we can reference any property in the attributes property of the vector object. This would be a static value that doesn't change dynamically with the zoom level.

But we can also refer to a function. The functions get looked up in the feature property context.

In line 21: we create a new OpenLayers.Style with our extendes default symbolizer and the context property that holds the function to calculate the dynamic radius.
This function in line 26: gets called every time the feature is drawn and the pointRadius gets evaluated. As a single parameter it gets the feature.
Here we can set the radius in relation with the zoom level of the map and calculate the displayed pointRadius.

Friday, May 11, 2012

Using The ActionBar Design-Pattern From Android Version 1.6 On And Higher

Now, as Android developers we are in a big break of UI-Design and usability. The fancy Holo theme from Android ICS lingers in the future but most of the devices runns still with 2.3. Without the ActionBar I wouldn't develope an app. Here is the way to overcome the shortcomings.


If you want to use the ActionBar design pattern you can do it with the great ActionBarSherlock library from Jake Wharton.

He has done a good job with the library and helps you out with any questions in his google group.
Have a look at his demo app at google play. It shows you most of the features.

ABS (ActionBarSherlock) is an extention to the official support package with the minimum API level of 7 or platform version 2.1.x.
So you need as a requirement at leased the android-support-v4.jar. That means you should have a closer look what this API offers you.

Steps to get you going

  1. Download the ABS library and unpack it.
  2. Import the ABS library.
    Start Eclipse, Import -> Android -> Existing Android Code Into Workspace
    In your Package Explorer you should see a project called ActionBarSherlock
    It has the Compiler compliance level 1.6 and in the libs folder you will find the android-support-v4.jar.
  3. Create a test project.
    New -> Android Projects
    Project Name: TestABS
    Build Target: Android 4.0.3
    Add the ABS-Library to your project.
    Right click on the project -> Properties -> Android -> Library -> Add... -> ActionBarSherlock
  4. Setting the sdk version and the theming.
    Edit the AndroidManifest.xml
    <uses-sdk android:minSdkVersion="7" android:targetSdkVersion="15"/>
    <activity ... android:theme="@style/Theme.Sherlock">
  5. Use the ABS base classes for the Activity
    public class TestABSActivity extends SherlockActivity {
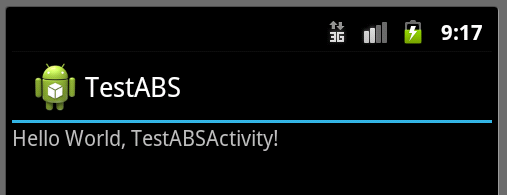
Now you can start your AVD with lets say Android version 2.3.3 and you will see the ActionBar with the Holo theme.


The downloaded library package includes the sources for the demo app.
This is a good starting point to explore alle the capabilities of ABS.

APK-Size

  38 kB - Standard hello world
515 kB - ABS hello world


Wednesday, March 28, 2012

Using Multiple Dropbox Accounts For One Windows User Account

Dropbox is great but it laks the ability to run multiple Dropbox accounts for one windows account.
Me and my gilfriend share the same computer and the same windows account because it doesn't make sense for us to switch it constantly.

Here a step to step tutorial to fix the problem for windows 7.

Step 1:
Create a new user account (Barney).
This user must be password enabled!

Step 2:
Log into the account and install Dropbox.

The Dropbox installation goes to following default folder:
c:\Users\Barney\AppData\Roaming\Dropbox\

Place the Dropbox folder for your documents and files into one that is accessible to your primary windows user account like:
c:\Barney\Dropbox

Step 3:
Log into the main account.
Create a batch file with following content:

 runas /user:Barney /savecred C:\Users\Barney\AppData\Roaming\Dropbox\bin\Dropbox.exe  

If you start it, the password from the Barney account is promted.
The option /savecred means that your password will be saved and you won't get asked again.

You can start both Dropbox installation in parallel.


If you heard about the security problem from the 2011-06-20 where you could log into every account with no password for a periode of 4 hours you should secure your important files.
Fortunately I found BoxCrypt that does the job for me.

happy sharing

Wednesday, February 1, 2012

How To Start Eclipse With A Certain Workspace

It is recomended to use one Eclipse installation with multiple workspaces. If you do so, Eclipse starts allways with the last used workspace. (Ok not allways, there is this annoying 'Workspace Laucher' that nobody uses)
If this is not the desired workspace, you have to switch it after Eclipse has loaded. This is annoying and time consuming.

The solution lies in a command line argument.

 eclipse.exe -data d:\downloads\eclipse\workspace\  

Create for every workspace a desktop link with the specific command line arguments.


Tuesday, January 31, 2012

Android Logo Vector Drawings

My first steps in Illustrator. More will come!
Download it at the bottom and use it for free.


Illustrator file: Android.ai

Monday, January 30, 2012